
There are a few things I tend to indulge in: shoes, naps, and sugar. And while I have cut back on sugar over the past couple of years, I figure a good nap and a cute pair of shoes never hurt anybody so, as long as they fit into my budget and schedule, I'll buy the shoes and take the nap! Post graduation, closet space has been a bit of a challenge. I went to undergrad and grad school in smaller college towns where you could find an apartment with one or two walk-in closets for half of what you'd pay here in Houston. No need for a custom shoe closet. It was wonderful.
When moving back in with my family, I had to get creative. I wasn't storing sweaters in the oven like Carrie Bradshaw (I actually cook!) but I did have clothes and shoes in bins, hall closets, and under my bed. In fact, during move-in at my new house, the number one question among my team was "Where did you keep all of this?!" Closet solutions were top of mind and I moved in with a few ideas on how to make this custom shoe closet happen. Today's post is all about how to easily create a custom shoe closet over the weekend plus a little shoe shopping inspo.
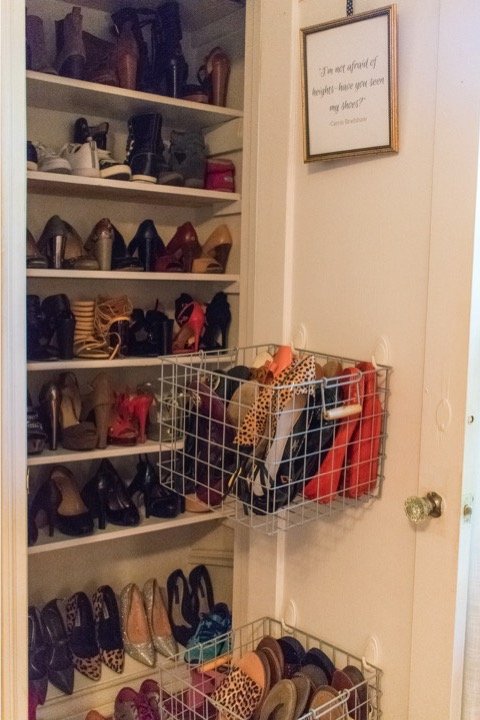
My house is over 60 years old and closets weren't as big of a thing (literally) when it was built so I knew I couldn't have every item in one place without converting a room and I'm not that over the top...yet. I decided to devote the small master closet to shoes, which would require shelving it out from floor to ceiling. And that's how this project, which is really easy, came about. The hardest part was visiting different Home Depot and Lowe's locations multiple times only to find that all their wood-cutting machines weren't working. Yeah. Thankfully, my uncle has every tool known to man, including a saw, and was willing to spend a little bit of his Saturday morning knocking this project out.

If you don't have a handy uncle nearby, you can grab a friend or family member to help get the job done in no time flat. The actual construction didn't take more than a couple of hours with two people but I call this a weekend project to factor in shopping for the materials, doing any necessary closet purging, and allowing the paint to dry before filling it up! Believe it or not, I did some shoe purging during this project and donated a few pairs. My mother, sisters, and I all wear the same size shoe but I have wide feet (hence the shoe stretchers you'll see in some pictures) so they typically can't wear my shoes after I've had them awhile. Hopefully, somebody with a size 10 and good taste is strutting around town in the ones I let go of. 🙂

Rather than overpay for prefabbed shelves (which would have still needed cutting to fit into my closet), I purchased three pieces of wood for this project and all the materials came in under $35. The specs are below but your requirements may differ depending on the size of your closet. Then I measured and marked off where each cut should be to make the shelves and supporting cleats. My uncle cut them, put everything into place, and even painted. I can't take credit for the slanted shelf at the bottom as it was already part of the closet. There were also two existing level shelves at the top and another that was weirdly slanted in the opposite direction but we moved those around and added an additional four shelves.
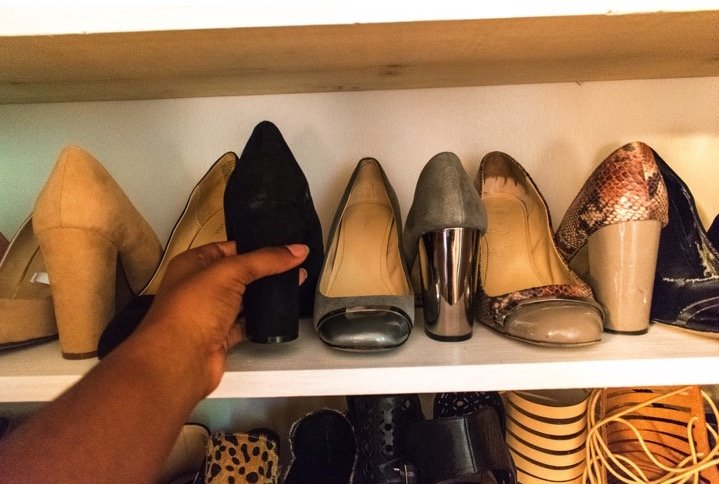
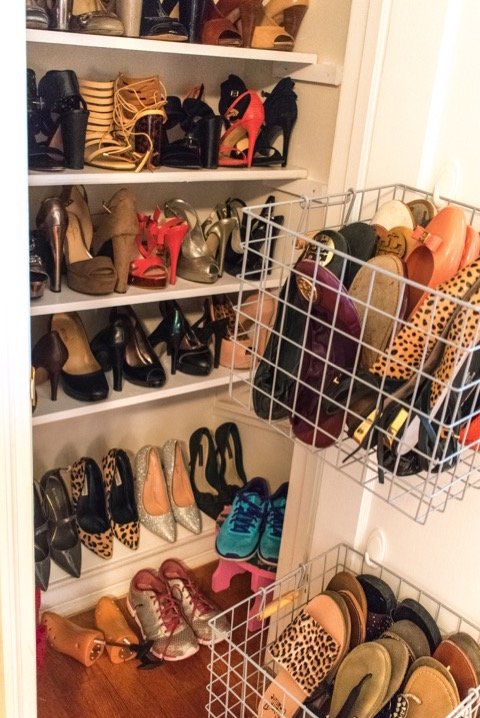
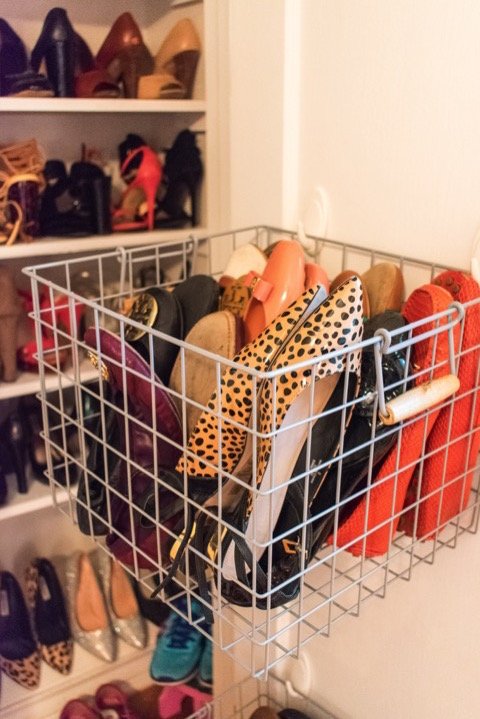
Maybe I am over the top because the shelves didn't quite cut it as far as fitting everything in, so I also added two baskets to the inside of the closet door to hold my sandals and flats. I just used wire milk crates I found at Target and a few Command hooks. Now, everything is copacetic. All the shoes are in one spot. I have them organized by style, with my boots in boxes at the very top because Texas weather only lets them out to play for a short time each year. My clothes are orderly, as well. You might recall that my home office has a more sizable closet and, thus, houses my clothing wardrobe. Creating this place for my shoes cleared the way for complete order and tranquility in the home office/closet. More on the organized clothing closet here and here.
Shopping Inspo for Your Shoe Closet
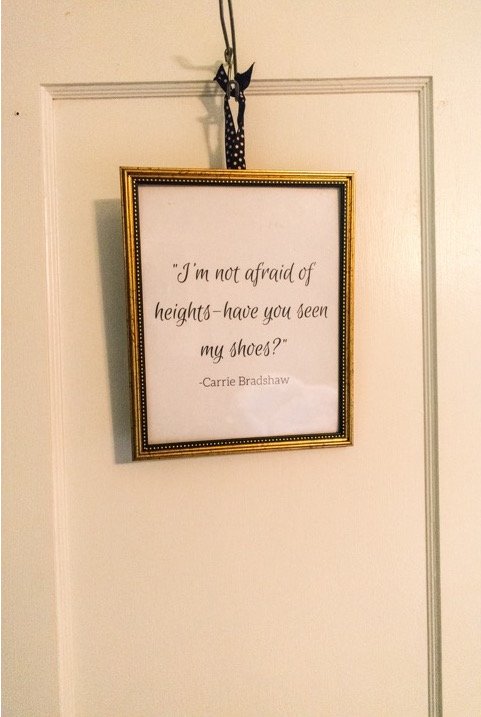
To reiterate, this shoe closet is in my master bedroom, which means it was originally designed to hold a married couples' shoes AND clothes back in 1951! This always reminds me of when Carrie and Big toured the Heaven on 5th penthouse and she said "Well, now I see the reason for the divorce." after peeping the teeny tiny master closet. As my uncle said, "People must not have worn too many different outfits back then." which leads me to say that I completely get that a shoe closet isn't a need or even necessarily normal but I am seizing the opportunity to spread out and indulge a little while I can.

Who knows what my life or wardrobe will look like years down the line when a spouse and children come into the picture? Speaking of wardrobe, I linked all the shoes from my closet that I could just below as well as where I typically shop for them. I shop sales and many of these pairs are quite old but I was able to find quite a few so hopefully any that catch your eye are still in stock. If you have questions about a pair that isn't linked, just ask me in the comment section below or shoot me an email. I can talk about shoes and bargains all day!
Cheetah Flats | Black Calf-Hair Sandals | Black Sparkly Mules | Gray Bow Mules | Black Pumps | Nude Pumps | Pink Slingback Pumps | White Adidas | Black Ballet Flats | Patent Ballet Flats | Leopard Slides | Pink Toms | Black OTK Boots | Nike Flex | Black UGG Boots
Where I shoe shop: ASOS- Dillards- DSW - eBay - Nordstrom - Nordstrom Rack - Target - Tory Burch
Shoe Closet Shelves Tutorial

What You'll Need:
- Tape measure
- Pencil
- Hammer
- 3-inch nails
- Level
- 12 by 1-inch wood piece(s) for shelves
- 2 by 1-inch wood piece(s) for cleats
- Paint (optional)
How to Install Shoe Closet Shelves:
- Measure and mark where each shelf will sit within the closet then mark the distance with pencil and blue painter's tape. The tape serves as a guide for where to place each cleat. I left 10 inches of space between each shelf because I have a lot of high heels.
- Measure and cut 12 X 1 wood piece into the number of shelves you need. Measure and cut the 2 by 1 wood piece into the number of cleats you need (two for each shelf). The cleats support the shelves, so you want them to be at least half as long as the depth of the shelves themselves, i.e., six inches or longer for a 12-inch shelf. I measured mine to be 9 inches long.
- Secure each cleat with two or three nails, checking for levelness after the first nail and adjusting as necessary.
- Place a shelf on top of each set of cleats and secure it to each cleat with a nail. Repeat with each shelf. I think it's easiest to work from bottom to top.
- From here, you can paint or add contact or wallpaper to achieve whatever look your want. I opted for white paint simply because it was the existing color of the closet and I had extra in my garage from a prior project. The last step is to add in all your shoes. If you still need more space, scroll for the next tutorial.

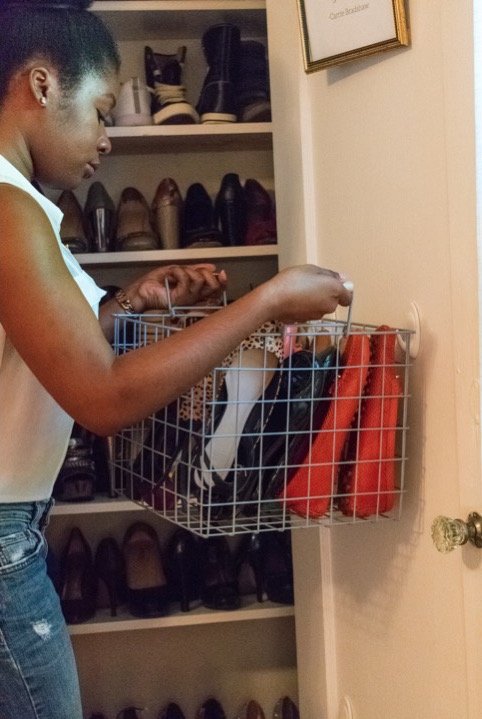
Shoe Closet Door Baskets Tutorial
This is a simple hack to add more storage space inside your shoe closet door using removable wire baskets. The use of Command adhesive hooks makes this a renter and re-seller friendly trick!
What You'll Need:
- 2 wire baskets
- 4 Command adhesive hooks (each hook should support a minimum of 3 pounds, depending on how much weight you'll put in each basket.
- Tape Measure
- Pencil
How to Install Shoe Closet Door Baskets:
- Hold each basket up against the door and mark the desired spots with a pencil. Be sure the door will close with the basket placement.
- Place your hooks on the door according to package directions.
- Add your shoes (or whatever you're storing) to each basket and hang on hooks.


I hope this shoe closet tutorial is helpful to you and that your week is going swimmingly so far. Come back on Thursday for a fun new cocktail recipe involving tequila and champagne! And sharing is caring, so be sure to pin this tutorial on Pinterest. Thanks for reading!

Shop my Shoe Closet


Angie says
Oh, This is what I need. Shoes, Shoes, Everywhere, they need a home, too. I have a lot of shoes, too.
I need a closet especially for shoes, boots, flats, heels, flip flops and slippers. I love this idea. I'll have to show this to my husband. LOVE LOVE LOVE!
Jazz says
Hope you get the shoe closet of your dreams, Angie!
Heidi says
I know this is an older post but just wanted you to know your shoe basket idea is genius! I am in the process of moving to a new home, and while it does have a generous walk in closet, I will be forced to share it with my hubby. And I have LOTS of shoes. Putting my flats and sandals in baskets will save room for my prettier shoes to be on display. Thanks for the amazing idea!
Jazzmine Woodard says
You're so welcome, Heidi! Congratulations on your new home.
Toni says
The exact details I was looking for to build my own customized shoe closet. Thank you for the wonder details.
kristina says
love the basket idea for flip flops and flats!
101foodtravel says
Oh my I love this, those shoes are gorgeous. I told my husband I need my own shoes closet because I want it seems and display lol. I love your closet lady.
kage2015 says
Okay your husband wins husband of the month for making you this awesome shoe closet.
Jasmine S. says
Girl, you look great!! And shoes + organization have got to be on my list of favorite things ever. Love this!
Jazz says
Thank you so much! Those are two of my favorite things as well!
Jen Seislove says
This is outstanding! I love the use of the baskets for those flip flops and flats! I'm going to show this to my husband to see if he can make this...but I'm a little worried that he'll realize just how many shoes I own. Lol.